I live in a rather congested wifi neighborhood, there are strong active wifi signals in every house in front and back and next door etcetera. Our wireless routers have all sat next to the exterior wall through which the Cox coax comes through, and for about ten years, through three different wireless router upgrades, I relied on an aluminum flashing sheet placed between the wall and the wireless router, to keep everything as good as possible. Just one room away, line-of-sight through a double doorway without doors, I’d get 3-4 bars only without that sheet. This occurred even though I would check and usually change wifi channels every 3-6 months! The wireless-only Roku is in that room next door, so problems are easy to spot.
Anyway, about a year and a half ago it was wireless-router-buying time again (it has been historically a matter of frustration factor…), and I bought one of these off of eBay:

Initially it was simply a nice, reasonably well-behaved, one-notch improvement over the previous, like all of my previous upgrades. It’s recommendable, but not the purpose of this article. I got four solid bars to the next room over despite the neighborhood, using the flashing, which is what I expected. Still only 2-3 to the bedroom to my sweet wife’s tablet, and worse upstairs. And then I remembered something. Some years before I had bought this pair:

which are standard +9 Dbi wifi antennas, for $20. I had bought them and then realized my router of the time did not have removables. They fit this one. I bought one more, a +12 DBi, to make it three. The originals were the usual stubbies about six inches long, these are more like fourteen.
Five bars in line of sight. Four bars steady everywhere else in the house, including upstairs, and just outside. No flashing anymore. And I haven’t had cause to check wifi environment at all since the better antennas went in.
Wifi devices that have removable antennas, use a very standard connector for those antennas. There are rare exceptions, but the standard is very widespread, especially for indoor models. I will not be buying wireless routers without removable antennas ever again if I have any say in it, and we’ll see if I ever need to replace these antennas!
Categories:
Wifi
Performance

There are QoS settings which can be made within Windows! They work with desktop and server OSes, to set priorities on either network traffic of specific binaries, or by port and type. If you see programs or services stopping unexpectedly, stuttering, et cetera, this is good to try. Here is a basic guide in PDF:
http://notes.ponderworthy.com/file_download/12/Basic_PC_QoS.pdf
The steps:
- Load up
MMC.EXE.
- Open the File menu
- Choose Add/Remove Snap-In.
- Click Group Policy Object Editor on the left.
- Click Add.
- Click Finish.
- Click OK.
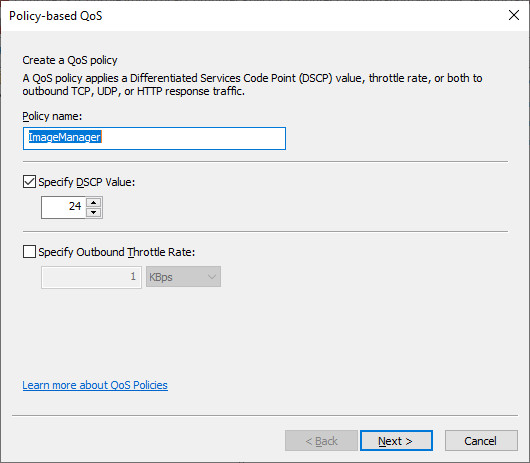
- Open up Local Computer Policy, Computer Configuration, Windows Settings, Policy-based QoS. You’ll see the following, with the policy list being blank if you haven’t done this yet.

- Right-click on Policy-based QoS, and choose Create new policy. Set a name, and then set the DSCP value:
The DSCP value is the priority level for the policy. The range is zero through 63. Here is one common DSCP value set:
0 …………………..General Traffic, unprioritized
10 …………………Backups, file transfers, non-business applications
25 …………………Mission-critical data, including SQL, video streaming
34 …………………Video conferencing
46 …………………VoIP
Another set, not quite the same, standardized within the WMM wifi standard:
8-23 ………………Background (BK)
24-31, 0-7 ………Best effort (BE)
32-47 …………….Video (VI)
48-63 …………….Voice (VO)
The above are far from a coherent standard everywhere; one can even find lists which peak at 30. For my needs within PCs, I have been setting my critical apps at 31, important apps at 24, and not bothering with anything else. And it is needful to be conservative. If you QoS some things too high, Windows won’t be able to do background things which keep it running…like, say, the Windows desktop ☺
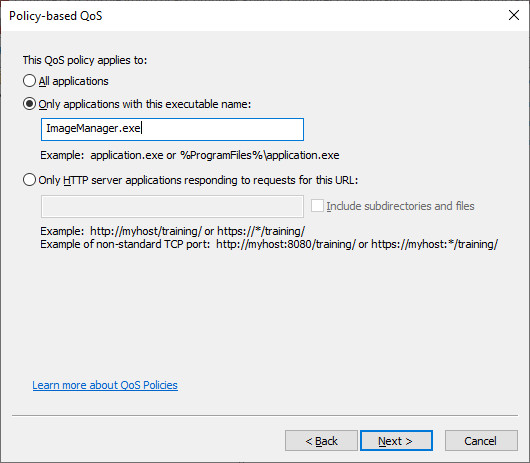
- At this point you need to decide on the type of QoS policy you are creating. You create them to work by TCP/UDP port for all applications, for application binaries of specific names, and for HTTP/HTTPS URLs.
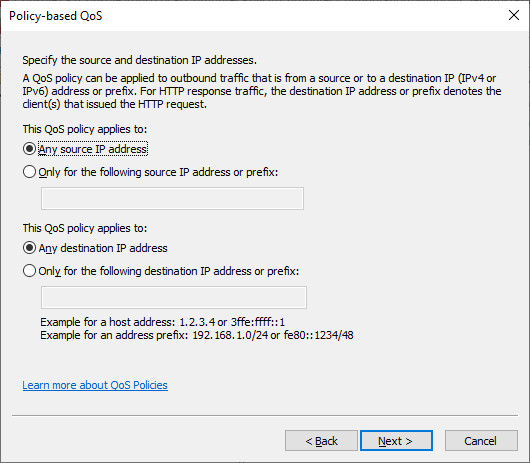
- You may now choose IP address(es) to which the policy applies.
- And then TCP and/or UDP ports to which the policy applies. Default is TCP only.
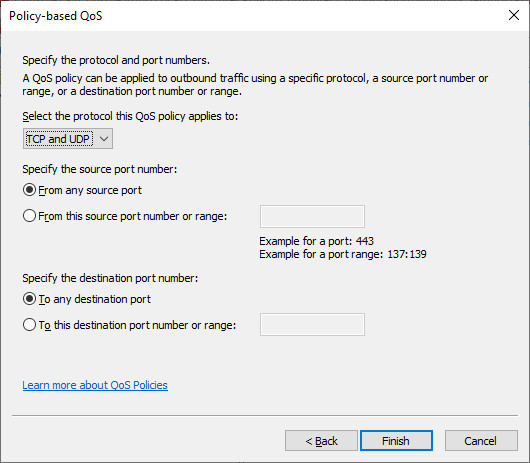
And now you’re done with that policy, and you can create as many more as desired.
Categories:
Performance
The MMCSS (not sure why the extra letters) is a service in Vista (SP1+), 7, Server 2008, and Server 2008R2, which places priority on video and audio data. Here are some good tweaks. Click here for a VBS script, called MCSO, which does everything below automatically.
So we go here in the registry:
HKEY_LOCAL_MACHINE\SOFTWARE\Microsoft\Windows NT\CurrentVersion\Multimedia\SystemProfile
open the item named “NetworkThrottlingIndex”, and change it to “FFFFFFFF” (that’s eight F’s) hex. We can do the same for “SystemResponsiveness”.
Then drill further down to here:
HKEY_LOCAL_MACHINE\SOFTWARE\Microsoft\Windows NT\CurrentVersion\Multimedia\SystemProfile\Tasks
and you’ll see a list of folders. Each folder is a “multimedia profile” according to one reference. Each can contain the following:
Affinity        dword:00000000
Background Only        False
BackgroundPriority        dword:00000001
Clock Rate       dword:00002710
GPU Priority        dword:00000001
Priority       dword:00000001
Scheduling Category       High
SFIO Priority       High
I kept the “Window Manager” set at the default, and set the rest to the above. According to one reference it is possible to create custom multimedia profiles and use some applications’ capabilities to assign them, I have not tried this yet.
According to one reference, the above changes only activate at reboot. However, I have found that if you restart MMCSS and then Audiosrv, the same results obtain.
Addendum. Have just recently looked into Windows 10 in this. It appears to be a driver, not a service, in 10. Will be investigating further. Not sure about Audiosrv either.
Categories:
Windows OS-Level Issues
Performance
This:
https://www.winzipsystemtools.com/driver-updater.html
works very well indeed. It knows about drivers which aren’t covered by any of the several other good ones I keep up with. One driver install at a time is free of charge, $30 per machine for automatic.
Categories:
Drivers
Performance
Compiling a kernel does give you lots of added speed and memory-efficiency, if you do it right. Here’s one way way to do it right. I’m using it most joyfully on MX Linux, on two very different machines, right now. The steps below are for Debian and derivatives only. Manjaro has an AUR package called linux-xanmod.
- First enable sources for the kernel in the package manager. Not sure how this is done in Ubuntu. In close Debians, check
/etc/apt/sources.list.d/debian.list, make sure the deb-src lines are not commented out. That means if you see any lines like this:
#deb-src http://deb.debian.org/debian buster main contrib non-free
make them look like this:
deb-src http://deb.debian.org/debian buster main contrib non-free
- Next step is to have apt take in all standard packages for kernel building (the third line is specified as for 64-bit Wintel hardware):
sudo apt-get update
sudo apt-get install build-essential bison flex pkg-config qtcreator qt5-default qttools5-dev-tools libssl-dev
sudo apt-get build-dep linux-image-amd64
- Now we create a folder and clone the current Xanmod source into it:
cd
mkdir custom-kernel-xanmod
cd custom-kernel-xanmod
git clone https://github.com/xanmod/linux.git xanmod
- And now we get down to business. We enter the source tree, and compile a GUI configurator, xconfig.
cd xanmod
make clean
make xconfig
- After xconfig has been made, it will bring up a GUI. The GUI has a search capability (thank God for his often unaware servants), you’ll want to search (Control-F) for the following:
HZ_1000 is a setting which is highest of five, expressed as “1000 HZ”. It is timer interrupts per second. For non-desktop systems, 500 is often recommended. For anything desktop or multimedia, use 1000.
CONFIG_MNATIVE is a setting which is bottom-most of a long list of specific CPU models. Unlike the others, this setting tells the compiler to optimize its output for the specific CPU in the very machine which this procedure is being run on. Using this will invariably get you a very, very fast kernel for this machine. Don’t try to use this kernel on a different machine, unless you know for certain that the different machine has exactly the same CPU.
- I have found the two above to produce really great performance. The third one I use,
CC_OPTIMIZE_FOR_SIZE, is a non-default setting whose opposite is CC_OPTIMIZE_FOR_PERFORMANCE, and they mean what they say. In Debian, Ubuntu, Manjaro, and Arch Linux, I optimize for size in 8 or less gigabytes of RAM, and for performance in more; in antiX and MX Linux, I optimize for size in less than 4 gigabytes of RAM, they have been handling an amazing number of Chrome tabs (a nice practical test) in just 4G RAM. That is an amazing disparity, but as of this writing (March of 2020) this is what I have been finding.
- File/Save, File/Exit, or Control-S then Control-X.
- Run ‘htop’, to see how many apparent CPU cores are available. Add 1 to this number. Let’s say the result is 3.
- Compile the kernel. Notice the 3, you’ll want to replace this with the calculated number. This sets up the compilation to use all of your CPU cores at maximum efficiency, and speeds up the process according to what you have.
make -j3 deb-pkg LOCALVERSION=-xanmod-1000-native
- Unless it failed for some reason, the .deb packages are one level above in directories. Go there and install:
cd ..
sudo dpkg -i linux-image*.deb linux-headers*.deb
- You can then boot and use Tab before the kernel loads to choose the new kernel. Or, you may want to install and use
grub-customizer to choose the new kernel as standard.
Categories:
Linux OS-level Issues
Performance
On Manjaro, Debian, Ubuntu, and several others, these items are known help a lot in any application, including desktop, web server, or terminal server. The end of this post has two large compilations of these settings, one for wired (“non-lossy”) networking, one for wireless (“lossy”).
Do not use these on antiX or MX Linux, their developers have done much better right off the ISO. If you want more, recompile the Xanmod kernel for performance.
On the vast majority of Linux distributions, one can just add these changes to /etc/sysctl.conf, and then run sysctl -p to apply them without reboot. However, recent additions to standards have enabled us to place custom settings in our own configuration files, so that we don’t take /etc/sysctl.conf out of distro control.
On recent Debian and Ubuntu, we may best put them in /etc/sysctl.d/99-custom.conf (or replace the word “custom” to your liking), and then run sysctl --system to load both /etc/sysctl.conf and everything under /etc/sysctl.d. The 99 causes it to be run last, i.e., to override any others. But look at what already is there; sometimes there is already a last 99.
On some other recent distros, it’s /etc/sysctl.d/custom.conf (the word “custom” is still arbitrary), and then run systemctl restart systemd-sysctl.
You can check your results with sysctl -A.
The first group is for wired networking performance:
net.ipv4.tcp_window_scaling=1
net.ipv4.tcp_workaround_signed_windows=1
net.ipv4.tcp_sack=1
net.ipv4.tcp_fack=1
net.ipv4.tcp_low_latency=1
net.ipv4.ip_no_pmtu_disc=0
net.ipv4.tcp_mtu_probing=1
net.ipv4.tcp_frto=2
net.ipv4.tcp_frto_response=2
net.ipv4.tcp_congestion_control=illinois
A bit different first group for networking performance, is recommendable for anything involving wireless, i.e., “lossy” networks:
net.ipv4.tcp_window_scaling=1
net.ipv4.tcp_workaround_signed_windows=1
net.ipv4.tcp_sack=1
net.ipv4.tcp_fack=1
net.ipv4.tcp_low_latency=1
net.ipv4.ip_no_pmtu_disc=0
net.ipv4.tcp_mtu_probing=1
net.ipv4.tcp_frto=2
net.ipv4.tcp_frto_response=2
net.ipv4.tcp_congestion_control = hybla
net.ipv4.tcp_allowed_congestion_control = hybla cubic
And then some general networking performance items:
net.core.rmem_default = 31457280
net.core.rmem_max = 12582912
net.core.wmem_default = 31457280
net.core.wmem_max = 12582912
net.core.somaxconn = 4096
net.core.netdev_max_backlog = 65536
net.core.optmem_max = 25165824
net.ipv4.tcp_mem = 8388608 8388608 8388608
net.ipv4.udp_mem = 8388608 8388608 8388608
net.ipv4.tcp_rmem = 8192 87380 16777216
net.ipv4.udp_rmem = 8192 87380 16777216
net.ipv4.udp_rmem_min = 16384
net.ipv4.tcp_wmem = 8192 65536 16777216
net.ipv4.udp_wmem = 8192 65536 16777216
net.ipv4.udp_wmem_min = 16384
net.ipv4.tcp_max_tw_buckets = 1440000
net.ipv4.tcp_tw_recycle = 1
net.ipv4.tcp_tw_reuse = 1
net.ipv4.route.flush=1
And some for network security enhancement:
net.ipv4.tcp_synack_retries = 2
net.ipv4.ip_local_port_range = 2000 65535
net.ipv4.tcp_rfc1337 = 1
net.ipv4.tcp_fin_timeout = 15
net.ipv4.tcp_keepalive_time = 300
net.ipv4.tcp_keepalive_probes = 5
net.ipv4.tcp_keepalive_intvl = 15
And now a few to keep virtual memory usage under good control:
vm.swappiness=20
vm.dirty_ratio = 60
vm.dirty_background_ratio = 2
And one to increase the maximum number of open and watched files, very helpful indeed for servers, file synchronization of all sorts, and many other functions:
fs.file-max = 2097152
fs.inotify.max_user_watches = 524288
The above was compiled from these two excellent articles:
http://www.networkworld.com/article/2227856/opensource-subnet/best-networking-tweaks-for-linux.html
https://easyengine.io/tutorials/linux/sysctl-conf/
and other sources. Here is the whole set for wired (non-lossy) networking:
net.ipv4.tcp_window_scaling=1
net.ipv4.tcp_workaround_signed_windows=1
net.ipv4.tcp_sack=1
net.ipv4.tcp_fack=1
net.ipv4.tcp_low_latency=1
net.ipv4.ip_no_pmtu_disc=0
net.ipv4.tcp_mtu_probing=1
net.ipv4.tcp_frto=2
net.ipv4.tcp_frto_response=2
net.ipv4.tcp_congestion_control=illinois
pre. net.core.rmem_default = 31457280
net.core.rmem_max = 12582912
net.core.wmem_default = 31457280
net.core.wmem_max = 12582912
net.core.somaxconn = 4096
net.core.netdev_max_backlog = 65536
net.core.optmem_max = 25165824
net.ipv4.tcp_mem = 8388608 8388608 8388608
net.ipv4.udp_mem = 8388608 8388608 8388608
net.ipv4.tcp_rmem = 8192 87380 16777216
net.ipv4.udp_rmem = 8192 87380 16777216
net.ipv4.udp_rmem_min = 16384
net.ipv4.tcp_wmem = 8192 65536 16777216
net.ipv4.udp_wmem = 8192 65536 16777216
net.ipv4.udp_wmem_min = 16384
net.ipv4.tcp_max_tw_buckets = 1440000
net.ipv4.tcp_tw_recycle = 1
net.ipv4.tcp_tw_reuse = 1
net.ipv4.route.flush=1
vm.swappiness=20
vm.dirty_ratio = 60
vm.dirty_background_ratio = 2
fs.file-max = 2097152
fs.inotify.max_user_watches = 524288
and another full set for wireless / lossy networking:
net.ipv4.tcp_window_scaling=1
net.ipv4.tcp_workaround_signed_windows=1
net.ipv4.tcp_sack=1
net.ipv4.tcp_fack=1
net.ipv4.tcp_low_latency=1
net.ipv4.ip_no_pmtu_disc=0
net.ipv4.tcp_mtu_probing=1
net.ipv4.tcp_frto=2
net.ipv4.tcp_frto_response=2
net.ipv4.tcp_congestion_control = hybla
net.ipv4.tcp_allowed_congestion_control = hybla cubic
pre. net.core.rmem_default = 31457280
net.core.rmem_max = 12582912
net.core.wmem_default = 31457280
net.core.wmem_max = 12582912
net.core.somaxconn = 4096
net.core.netdev_max_backlog = 65536
net.core.optmem_max = 25165824
net.ipv4.tcp_mem = 8388608 8388608 8388608
net.ipv4.udp_mem = 8388608 8388608 8388608
net.ipv4.tcp_rmem = 8192 87380 16777216
net.ipv4.udp_rmem = 8192 87380 16777216
net.ipv4.udp_rmem_min = 16384
net.ipv4.tcp_wmem = 8192 65536 16777216
net.ipv4.udp_wmem = 8192 65536 16777216
net.ipv4.udp_wmem_min = 16384
net.ipv4.tcp_max_tw_buckets = 1440000
net.ipv4.tcp_tw_recycle = 1
net.ipv4.tcp_tw_reuse = 1
net.ipv4.route.flush=1
vm.swappiness=20
vm.dirty_ratio = 60
vm.dirty_background_ratio = 2
fs.file-max = 2097152
fs.inotify.max_user_watches = 524288
Categories:
Performance
Linux OS-level Issues
In an administrative Powershell, all of the following. Some OSes will not have all of them, just ignore any errors. Yesterday (10/23), on an older machine running Windows 10 with 8G RAM and a 1/2T platter drive, SATA bandwidth was showing a tad less than 1 megabit in Resource Monitor; afterwards, 10 megabit. Most gains have not been so high.
Enable-MMAgent -ApplicationLaunchPrefetching
Enable-MMAgent -ApplicationPreLaunch
Set-MMAgent -MaxOperationAPIFiles 8192
Enable-MMAgent -MemoryCompression
Enable-MMAgent -OperationAPI
Enable-MMAgent -PageCombining
Set-Service sysmain -StartupType Automatic
Start-Service sysmain
The last two enable and start the service, if necessary. The service is called Superfetch in services.msc, but very clearly, it does a whole lot more than drive fetching. It is not clear how the observed drive bandwidth increase is achieved. One theory has it that, with appropriate configuration, the service reorders OS disk reads and writes for maximum sequentiality, minimum seeks.
Categories:
Performance
Categories:
Servers
Performance
There are the commands currently known to this writer. These exist on Windows 8/2012 and up, though memory compression for at least one one item is not present in 8/2012. Do a Get-MMAgent to see what your OS has and what the status is. There are a lot of tweakables, it’s not small, especially on 10. There is a tweakable number immediately visible, “MaxOperationAPIFiles”.
Get-MMAgent
Set-MMAgent
Disable-MMAgent
Enable-MMAgent
Get-Help for the above did not help much. But the Microsoft web page for Disable-MMAgent shows that it will disable bits and pieces. Disabling memory compression is a good idea, it conserves CPU resources, if you have lots of RAM. Items known to be available:
-ApplicationLaunchPrefetching
-ApplicationPreLaunch
-OperationAPI
-PageCombining
-MemoryCompression
-CimSession <CimSession[]>
-ThrottleLimit <Int32>
-AsJob
So to disable only memory compression, out of all of the above functions, just run this PowerShell command:
Disable-MMAgent -MemoryCompression
The above works, even though -MemoryCompression is not listed in the Get-Help items for Disable-MMagent.
Another setting which may help, if you have an SSD or fast RAID, is to increase “the maximum number of prefetch files for scenarios that the Operation Recorder API records”. Default is 256.
Set-MMAgent -MaxOperationAPIFiles 1024
Categories:
Performance
If you see that Windows built-in search components (any of several, including the Indexer, Cortana, etc.) are using a lot of your disk bandwidth, run this in an administrative Powershell:
Add-AppxPackage -Path “C:\Windows\SystemApps\Microsoft.Windows.Cortana_cw5n1h2txyewy\Appxmanifest.xml” -DisableDevelopmentMode -Register
It appears to reset or reload Cortana or a big chunk of it, and probably disable “Development Mode” too. One web reference stated that the above has to be run in a newly created local admin profile to work.
Also, if you’re in a former (or, God forbid, current) SBS environment, make sure the SBS client is removed, and make sure GPO isn’t automatically reinstalling it.
Categories:
Windows OS-Level Issues
Performance