Longstanding, works well unless BITS is corrupt:
Start-BitsTransfer -Source $URL -Destination $Path
On 1809 and up:
curl.exe -O $URL
A pure Powershell method:
(New-Object System.Net.WebClient).DownloadFile($URL,$Path)
Longstanding, works well unless BITS is corrupt:
Start-BitsTransfer -Source $URL -Destination $Path
On 1809 and up:
curl.exe -O $URL
A pure Powershell method:
(New-Object System.Net.WebClient).DownloadFile($URL,$Path)
This scenario is common, though not necessarily obviously so:
DISM /Online /Cleanup-Image /RestoreHealth) won’t fix it, it reports needed data not available./Source:...INSTALL.WIM, where INSTALL.WIM resides on a mounted ISO of that Windows, even a freshly downloaded ISO, still fails due to needed data not available.The fact is that #3 above occurs because freshly downloaded ISOs lack many Windows updates. This is not quickly resolvable, but it is very resolvable given some time. Using this method, we will fix corrupt Windows images. You’ll need many gigabytes of disk space to work with.
So. The first step is to decide which Windows version we’re going to create an up-to-date INSTALL.WIM for, to be used by DISM. For this example we’ll say 64-bit Windows Server 2016. The ISO can be had (at this writing) at this page.
Download that ISO, and unpack it. In the SOURCES folder at the root, there is a large file called INSTALL.WIM, 5.6 gigs at this writing. Create folder D:\Server2016WIM (or whatever works for you) and move that WIM into it.
You will need to go to the Properties of the INSTALL.WIM file, and uncheck “Read-Only”, for some reason.
Now we need a tool called wsusoffline. It downloads the updates which we are going to put in that INSTALL.WIM file. It comes from www.wsusoffline.net. Unpack the zip file and run UpdateGenerator.exe. Set it up like this:
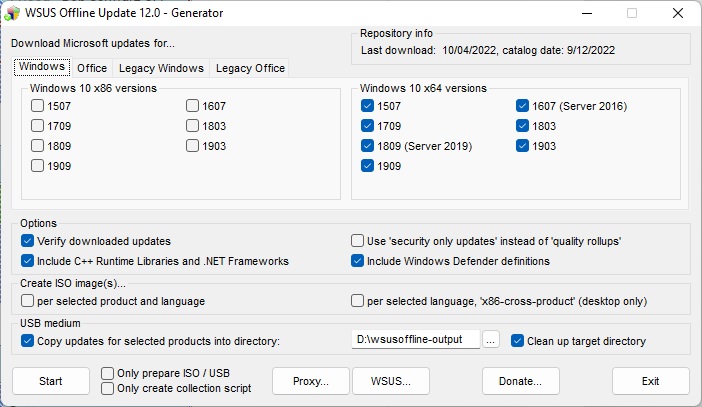
Make sure the “USB medium” target directory is useful and handy, We’re not using USB for this, just a different folder on the same drive that the WIM is in. Click Start, and it will download, verify, and store a whole lot of Windows updates in that folder. The above setup does make a repository for every 64-bit Windows 10-class OS, including Server 2016 and 2019. 2022 isn’t available here yet, we can expect it to be in the next edition of wsusoffline.
Once that download is done, we need to see which install(s) are in that WIM file. We do this thusly:
CD \SERVER2016WIM
DISM /Get-WimInfo /wimFile:install.wim
In the ISO I just downloaded, there are four installs, Server 2016 Standard without (1) and with (2) GUI, and Server 2016 Datacenter without (3) and with (4). Because our server to be repaired is not bare-bones, we want to update 2 and 4 just in case. So we prepare,
D:
CD \SERVER2016WIM
MKDIR Mounted-WIM
and mount the WIM in index 2:
DISM /Mount-WIM /WimFile:INSTALL.WIM /index:2 /MountDir:Mounted-WIM
The above will take a little while. We study D:\wsusoffline-output (see the wsusoffline image above), and we find that the Windows 10-class updates are here:
D:\wsusoffline-output\w100-x64\glb
So when the mount is done, we run the updates, still with current directory as above:
DISM /image:Mounted-Wim /Add-Package /PackagePath:D:\wsusoffline-output\w100-x64\glb
and a lot of nonapplicable updates are reported as errors, and a lot of successful updates are also reported, in a long report stream. This happens because every patch for every build of 10, 2016, and 2019 are all in that one folder. DISM knows which ones it needs, and will report success for those. But it often does not get them all on the first pass. So it can be helpful to run it again. Successful DISM fixes have been had without the second run, and the second run does take time, but the second is necessary for full completion.
Then we unmount and commit the changes:
DISM /Unmount-Wim /MountDir:Mounted-Wim /Commit
And it’s done! That WIM is ready to be used to de-corrupt a Server 2016 machine. We just have to get that file (6.5 gigabytes just now) onto a folder on the server or a network share, make that folder or share the current directory, and run:
DISM /Online /Cleanup-Image /RestoreHealth /Source:wim:Install.wim:2 /limitaccess
That’s index 2, index 4 may be needed if servers have roles only found in Datacenter. And after the DISM, some machines will need SFC /SCANNOW, because although DISM will bring in the needed items, it will not always put them everywhere they are needed.
If power is lost during the WIM procedures, you will probably have to run a cleanup and start over again. Check thus:
dism /get-MountedWiminfo
and cleanup thus:
dism /cleanup-wim
Reportedly, you may need to run those more than once. You may also have to delete subkeys in the registry here:
\HKEY_LOCAL_MACHINE\SOFTWARE\Microsoft\WIMMount\Mounted Images
and reboot, and then delete and recreate the folder Mounted-WIM.
Do these in order:
SFC /scannow
DISM /Online /Cleanup-Image /CheckHealth
DISM /Online /Cleanup-Image /ScanHealth
DISM /Online /Cleanup-Image /RestoreHealth
These fix a very large number of issues, 8.1/2012R2 and later. If SFC fails, run it again last, DISM sometimes has to repair the SFC component store. And occasionally, after SFC’s component store has been fixed and SFC rerun, the DISMs need to be done again for completion.
Sometimes IPv6 networking goes haywire, on a PC, server, or even a whole network. Machines are there, ping may happen or not, but one, some, or all of them just insist on using oddball IPv6 IPs to connect to each other, even though nothing has been changed voluntarily. Given that even after all these years there still are no useful IPv6 blacklists on the Internet, and given the excellent methods in place to use IPv4, we see no need for IPv6 at this time.
But Microsoft does insist on using IPv6 inside its operating systems, so we must keep it running; disabling v6 does harm in a Microsoft environment. The following is Microsoft’s recommendation to instruct Windows to prefer IPv4, which does eliminate the above issue. One adds a DWORD here:
HKEY_LOCAL_MACHINE\SYSTEM\CurrentControlSet\Services\Tcpip6\Parameters\
named DisabledComponents. Hex value 20, binary 32. Then reboot.
A quick way to do the registry add, in administrative CMD:
REG ADD HKLM\SYSTEM\CurrentControlSet\Services\Tcpip6\Parameters /v DisabledComponents /t REG_DWORD /d 32
Still you’ll need to reboot to get it to take effect.
The info is from this reference.
HPE must be growing a sense of humor. This thing really works well:
Not something always to do — I’m kind of allergic to removing standard components — but certainly if you have anemic RAID or a slow hard drive, this will help, even before the necessary reboot:
Uninstall-WindowsFeature Windows-Defender
Servers only, alas, and this may go away in later server builds.
To see if there is cleanup to be done:
DISM /Online /Cleanup-Image /AnalyzeComponentStore
To remove obsolete and unused system files:
DISM /Online /Cleanup-Image /StartComponentCleanup
To remove obsolete and unused system files and also service pack uninstallation files:
dism /online /Cleanup-Image /SPSuperseded
To remove obsolete and unused system files and everything prior, making it impossible to reverse any patches:
dism /online /Cleanup-Image /StartComponentCleanup /ResetBase