Had a new one recently. A PC running Windows 10, up to date, was taking about 30 minutes to boot. Turning off Fast Startup seems to have fixed it. Reportedly this will do it:
powercfg /hibernate off
but I used a GUI method: Control Panel, Power Options, Choose what the power buttons do, Change settings that are currently unavailable, then unchecked “Turn on fast startup (recommended)”, then Save Changes.
The GUI method is reversible in GUI; the command-line method removed the GUI method from visibility.
Still not sure what the root cause of the situation is, or how to do prevention. But reportedly, a very large proportion of Windows users are in fact hibernating or similar, rather than turning off, and don’t know it, and this can cause Windows updates to fail and other issues related to networking.
- Open up an administrative Powershell. Run
IPCONFIG /ALL. That will get you a list of active NICs. DNS in use, is set for each NIC if you have more than one.
- The name of each NIC has a prefix that has to be omitted. There are a number of prefixes which are common. For a simple wired NIC, it’s usually “Ethernet Adapter”; on many HPE servers, IPCONFIG /ALL will therefore show the second NIC as
Ethernet adapter Embedded LOM 1 Port 2.
- So let’s say you have a LAN with three active DNS servers (10.11.12.13, 10.11.12.14, and 10.11.12.15), and you want your HPE server of the above description, with the first two NICs active, to use all of them. Here’s the Powershell commands:
Set-DnsClientServerAddress "Embedded LOM 1 Port 1" -ServerAddresses ("10.11.12.13","10.11.12.14","10.11.12.15")
Set-DnsClientServerAddress "Embedded LOM 1 Port 2" -ServerAddresses ("10.11.12.13","10.11.12.14","10.11.12.15")
- For a second example, let’s say we’re on a common workstation, and we want to change DNS from a static setting, to whatever DHCP will pass out:
Set-DnsClientServerAddress "Ethernet" -ResetServerAddresses
Longstanding, works well unless BITS is corrupt:
Start-BitsTransfer -Source $URL -Destination $Path
On 1809 and up:
curl.exe -O $URL
A pure Powershell method:
(New-Object System.Net.WebClient).DownloadFile($URL,$Path)
This scenario is common, though not necessarily obviously so:
- Windows 8.1/2012R2 through 11/2022 is corrupt.
- DISM (
DISM /Online /Cleanup-Image /RestoreHealth) won’t fix it, it reports needed data not available.
- The above DISM adding
/Source:...INSTALL.WIM, where INSTALL.WIM resides on a mounted ISO of that Windows, even a freshly downloaded ISO, still fails due to needed data not available.
The fact is that #3 above occurs because freshly downloaded ISOs lack many Windows updates. This is not quickly resolvable, but it is very resolvable given some time. Using this method, we will fix corrupt Windows images. You’ll need many gigabytes of disk space to work with.
So. The first step is to decide which Windows version we’re going to create an up-to-date INSTALL.WIM for, to be used by DISM. For this example we’ll say 64-bit Windows Server 2016. The ISO can be had (at this writing) at this page.
Download that ISO, and unpack it. In the SOURCES folder at the root, there is a large file called INSTALL.WIM, 5.6 gigs at this writing. Create folder D:\Server2016WIM (or whatever works for you) and move that WIM into it.
You will need to go to the Properties of the INSTALL.WIM file, and uncheck “Read-Only”, for some reason.
Now we need a tool called wsusoffline. It downloads the updates which we are going to put in that INSTALL.WIM file. It comes from www.wsusoffline.net. Unpack the zip file and run UpdateGenerator.exe. Set it up like this:
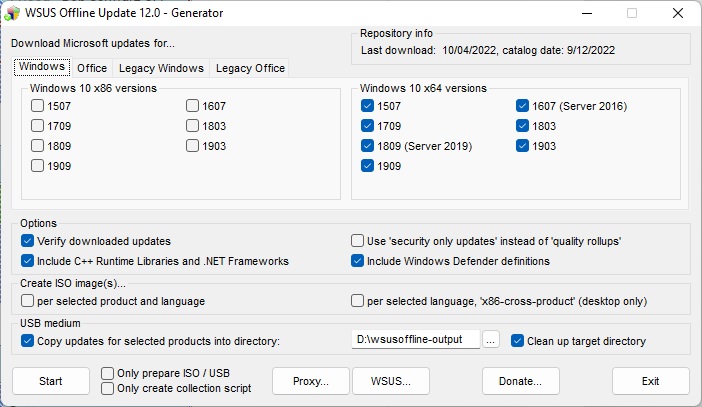
Make sure the “USB medium” target directory is useful and handy, We’re not using USB for this, just a different folder on the same drive that the WIM is in. Click Start, and it will download, verify, and store a whole lot of Windows updates in that folder. The above setup does make a repository for every 64-bit Windows 10-class OS, including Server 2016 and 2019. 2022 isn’t available here yet, we can expect it to be in the next edition of wsusoffline.
Once that download is done, we need to see which install(s) are in that WIM file. We do this thusly:
CD \SERVER2016WIM
DISM /Get-WimInfo /wimFile:install.wim
In the ISO I just downloaded, there are four installs, Server 2016 Standard without (1) and with (2) GUI, and Server 2016 Datacenter without (3) and with (4). Because our server to be repaired is not bare-bones, we want to update 2 and 4 just in case. So we prepare,
D:
CD \SERVER2016WIM
MKDIR Mounted-WIM
and mount the WIM in index 2:
DISM /Mount-WIM /WimFile:INSTALL.WIM /index:2 /MountDir:Mounted-WIM
The above will take a little while. We study D:\wsusoffline-output (see the wsusoffline image above), and we find that the Windows 10-class updates are here:
D:\wsusoffline-output\w100-x64\glb
So when the mount is done, we run the updates, still with current directory as above:
DISM /image:Mounted-Wim /Add-Package /PackagePath:D:\wsusoffline-output\w100-x64\glb
and a lot of nonapplicable updates are reported as errors, and a lot of successful updates are also reported, in a long report stream. This happens because every patch for every build of 10, 2016, and 2019 are all in that one folder. DISM knows which ones it needs, and will report success for those. But it often does not get them all on the first pass. So it can be helpful to run it again. Successful DISM fixes have been had without the second run, and the second run does take time, but the second is necessary for full completion.
Then we unmount and commit the changes:
DISM /Unmount-Wim /MountDir:Mounted-Wim /Commit
And it’s done! That WIM is ready to be used to de-corrupt a Server 2016 machine. We just have to get that file (6.5 gigabytes just now) onto a folder on the server or a network share, make that folder or share the current directory, and run:
DISM /Online /Cleanup-Image /RestoreHealth /Source:wim:Install.wim:2 /limitaccess
That’s index 2, index 4 may be needed if servers have roles only found in Datacenter. And after the DISM, some machines will need SFC /SCANNOW, because although DISM will bring in the needed items, it will not always put them everywhere they are needed.
If power is lost during the WIM procedures, you will probably have to run a cleanup and start over again. Check thus:
dism /get-MountedWiminfo
and cleanup thus:
dism /cleanup-wim
Reportedly, you may need to run those more than once. You may also have to delete subkeys in the registry here:
\HKEY_LOCAL_MACHINE\SOFTWARE\Microsoft\WIMMount\Mounted Images
and reboot, and then delete and recreate the folder Mounted-WIM.
At least in version 2.7.2 and close, SIP-ALG is apparently (seen via live logs and behavior…) active within a Watchguard, if you have a TCP-UDP proxy active. Doesn’t matter how much you turn off in that proxy, SIP-ALG is still active. The only way to handle it, apparently, is by disabling the policy altogether and replacing it with a TCP-UDP packet filter.
It’s by registry entry. Create these as DWORDs and set them to value 1:
HKCU\SOFTWARE\Microsoft\Office\15.0\Common\Identity\EnableADAL
HKCU\SOFTWARE\Microsoft\Office\15.0\Common\Identity\Version
HKCU\SOFTWARE\Microsoft\Exchange\AlwaysUseMSOAuthForAutoDiscover