By far, ‘guvcview’, “GTK+ UVC Viewer”:
http://guvcview.sourceforge.net/
Chooses from any of the audio devices on the machine, of any sort, including JACK audio sources; chooses from any video capture device; and combines the result. Simple to use and extremely effective. Only one I found to do all of this reliably, out of many.
Categories:
Video
For a very long time, it was thought gospel that Outlook had hard caps on size of PST and OST files, which equals a hard cap on the size of a mailbox that Outlook can see. This has, apparently, changed. 100-gigabyte OSTs are possible, and larger. It is thought that very fast hard drives primarily, and certainly also good CPU and lots of RAM, are needed to reliably handle huge mailboxes and PSTs without corruption. Here is a method by registry entries. It’s also possible by Group Policy.
https://support.microsoft.com/en-us/help/832925/how-to-configure-the-size-limit-for-both—pst-and—ost-files-in-outloo
https://www.msoutlook.info/question/increase-pst-file-size-limit
Today it was found that an Office 2019 installation via 365, did not have any of the registry keys involved. After creating them manually in Regedit, the desired results did occur. These very registry entries are also created by the Group Policy method.
Categories:
Outlook
Once you install the Office 2016 templates:
https://www.microsoft.com/en-us/download/details.aspx?id=49030
you can set the maximum sizes:
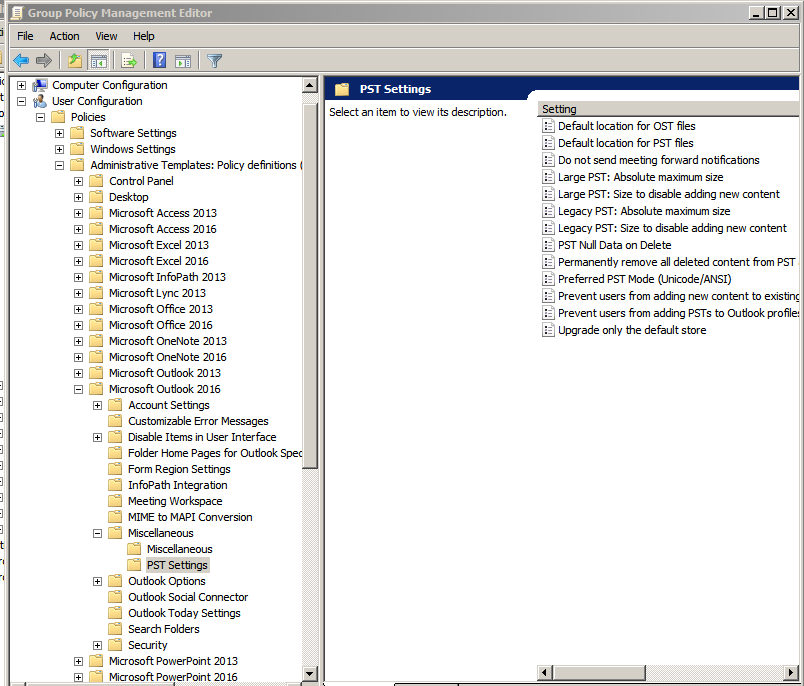
This creates the same registry entries as the manual method.
Categories:
Outlook & Exchange / Exchange Online
Outlook
An in-script fix:
[Net.ServicePointManager]::SecurityProtocol = [Net.SecurityProtocolType]::Tls12
A permanent fix:
Set-ItemProperty -Path 'HKLM:\SOFTWARE\Wow6432Node\Microsoft\.NetFramework\v4.0.30319' -Name 'SchUseStrongCrypto' -Value '1' -Type DWord
Set-ItemProperty -Path 'HKLM:\SOFTWARE\Microsoft\.NetFramework\v4.0.30319' -Name 'SchUseStrongCrypto' -Value '1' -Type DWord
Categories:
Powershell
Search the machine for the “Synchronization Service Manager”. That’s the GUI debugger.
Categories:
Azure
Windows OS-Level Issues
Some applications will crash or fail to run, asking for OpenGL emulation libraries, sometimes ANGLE libraries. Here are some:
https://www.nuget.org/packages/ANGLE.WindowsStore/2.1.13
Download the “Download package”, unpack it with 7zip, copy the DLLs in the “bin” folder to C:\Windows.
Categories:
Windows OS-Level Issues
Very simple via ‘ffmpeg’, there are versions for all major platforms:
ffmpeg -i audio.mp3 -i picture.jpg out.avi
The above will produce an .AVI, and if you change out ‘avi’ for ‘mp4’, ‘mov’, et cetera, ffmpeg will follow your lead and build the indicated format. However, if you want to make a file which Facebook and Youtube will accept, you’ll have to get a lot fancier:
ffmpeg -loop 1 -framerate 2 -i input_picture.jpg -i input_audio.mp3 -c:v libx264 -preset medium -tune stillimage -crf 18 -c:a copy -shortest -pix_fmt yuv420p output_video.mkv
Categories:
Video
Categories:
Outlook
Outlook & Exchange / Exchange Online
If there are very long folder or file names, or the path is just too long somewhere down in the tree, this will fail:
ICACLS X:\folder /Q /C /T /reset
but this will succeed:
ICACLS "\\?\X:\folder" /Q /C /T /reset
Apparently the latter incorporates a different API somewhere in the chain.
For TAKEOWN, we just have to run it in Powershell, not CMD.
Powershell code to do it all at once, while CD’d to the level just above, using command-line parameter to specify folder name, is here:
param(
[string]$location
)

$iexcmd = 'TAKEOWN /F ' + '"E:\Shared Data\' + $location + '" /R /D Y'
Write-Progress -Activity "Reset Permissions" -CurrentOperation $iexcmd -PercentComplete -1
Write-Host $iexcmd
iex $iexcmd | Out-Null

$iexcmd = 'ICACLS ' + '"\\?\E:\Shared Data\' + $location + '" /Q /C /T /reset'
Write-Progress -Activity "Reset Permissions" -CurrentOperation $iexcmd -PercentComplete -1
Write-Host $iexcmd
iex $iexcmd | Out-Null
Categories:
NTFS
Windows OS-Level Issues

Compiling a kernel does give you lots of added speed and memory-efficiency, if you do it right. Here’s one way way to do it right. I’m using it most joyfully on MX Linux, on two very different machines, right now. The steps below are for Debian and derivatives only. Manjaro has an AUR package called linux-xanmod.
- First enable sources for the kernel in the package manager. Not sure how this is done in Ubuntu. In close Debians, check
/etc/apt/sources.list.d/debian.list, make sure the deb-src lines are not commented out. That means if you see any lines like this:
#deb-src http://deb.debian.org/debian buster main contrib non-free
make them look like this:
deb-src http://deb.debian.org/debian buster main contrib non-free
- Next step is to have apt take in all standard packages for kernel building (the third line is specified as for 64-bit Wintel hardware):
sudo apt-get update
sudo apt-get install build-essential bison flex pkg-config qtcreator qt5-default qttools5-dev-tools libssl-dev
sudo apt-get build-dep linux-image-amd64
- Now we create a folder and clone the current Xanmod source into it:
cd
mkdir custom-kernel-xanmod
cd custom-kernel-xanmod
git clone https://github.com/xanmod/linux.git xanmod
- And now we get down to business. We enter the source tree, and compile a GUI configurator, xconfig.
cd xanmod
make clean
make xconfig
- After xconfig has been made, it will bring up a GUI. The GUI has a search capability (thank God for his often unaware servants), you’ll want to search (Control-F) for the following:
HZ_1000 is a setting which is highest of five, expressed as “1000 HZ”. It is timer interrupts per second. For non-desktop systems, 500 is often recommended. For anything desktop or multimedia, use 1000.
CONFIG_MNATIVE is a setting which is bottom-most of a long list of specific CPU models. Unlike the others, this setting tells the compiler to optimize its output for the specific CPU in the very machine which this procedure is being run on. Using this will invariably get you a very, very fast kernel for this machine. Don’t try to use this kernel on a different machine, unless you know for certain that the different machine has exactly the same CPU.
- I have found the two above to produce really great performance. The third one I use,
CC_OPTIMIZE_FOR_SIZE, is a non-default setting whose opposite is CC_OPTIMIZE_FOR_PERFORMANCE, and they mean what they say. In Debian, Ubuntu, Manjaro, and Arch Linux, I optimize for size in 8 or less gigabytes of RAM, and for performance in more; in antiX and MX Linux, I optimize for size in less than 4 gigabytes of RAM, they have been handling an amazing number of Chrome tabs (a nice practical test) in just 4G RAM. That is an amazing disparity, but as of this writing (March of 2020) this is what I have been finding.
- File/Save, File/Exit, or Control-S then Control-X.
- Run ‘htop’, to see how many apparent CPU cores are available. Add 1 to this number. Let’s say the result is 3.
- Compile the kernel. Notice the 3, you’ll want to replace this with the calculated number. This sets up the compilation to use all of your CPU cores at maximum efficiency, and speeds up the process according to what you have.
make -j3 deb-pkg LOCALVERSION=-xanmod-1000-native
- Unless it failed for some reason, the .deb packages are one level above in directories. Go there and install:
cd ..
sudo dpkg -i linux-image*.deb linux-headers*.deb
- You can then boot and use Tab before the kernel loads to choose the new kernel. Or, you may want to install and use
grub-customizer to choose the new kernel as standard.
Categories:
Linux OS-level Issues
Performance