Appears to be very very good. Better ping than many from some major ISPs. Also very sophisticated and configurable, and considerably less expensive for the features, than some.
Search results: CATE
New public DNS: NextDNS
article #1566, updated 508 days ago
.htaccess allows by IP, password authenticates if IP does not fit
article #1574, updated 550 days ago
There are multiple methods; this is reported to be undeprecated by Apache, possibly the only undeprecated way to do this.
AuthType Basic
AuthName "myserver publicname"
AuthUserFile "/myserverpath/.htpasswds/public/passwd"
require ip 11.12.13.14
require ip 11.12.13.15
require valid-user
SMTP conversation
article #133, updated 722 days ago
A sample SMTP conversation. You’ll need Putty (telnet mode!) in Windows, or Cygwin with ‘inetutils’ installed (for telnet), or the telnet for your Linux. The idea is that you are playing the role of a machine trying to send email through a mail server you select. You can learn causes of failure this way that you cannot learn any other way, or not at all easily.
- Blue is transmit.
- Red is receive.
- We start with a telnet on port 25. The first step is a Linux command line as written, directly translatable to Cygwin’s telnet, and GUIable in Putty.
- The messages received will vary somewhat, but the initial numbers won’t.
- The greater-than and less-than signs (< >) are required.
- Replace mail.domain.com with the FQDN or IP of the mail server. This is essential to get to the correct SMTP server.
- Replace test.domain.com with the Internet FQDN of the machine you are on if it exists, and otherwise, use test and the final domain name of the mail server you are trying to reach. This is how you are identifying yourself, as legitimately as available, to that mail server.
- Most SMTP servers, especially ESMTP servers, respond well to EHLO these days. A few still need the original, HELO.
- If it says OK at each step, the mail server has accepted what you have sent. Otherwise, it will give a short error, generally with a standard SMTP error code which you can look up.
- Choose the sender and the recipient carefully, according to what kind of test you are needing. For instance, if you are testing a simple mailbox, the FROM can be your own email address, and the TO can be a mailbox to which you have access, behind that mail server. Distribution lists and scan-to-email can indicate needed variations.
telnet mail.domain.com 25
220 mail.domain.com ESMTP
EHLO test.domain.com
250 test.domain.com
MAIL FROM: <sender@domain.com>
250 2.1.0 Sender OK
RCPT TO: <recipient@domain.com>
250 2.1.5 Ok
DATA
354 Enter mail, end with “.” on a line by itself
testing
testing
testing
.
250 2.0.0 Ok: queued as xxxxxxx
Restart All Failed VSS Writers
article #1513, updated 857 days ago
Found by the profound Brigg Bush:
$writers = vssadmin list writers |
    Select-String -Context 0,4 'Writer name:' |
    ? {$_.Context.PostContext[2].Trim() -ne "Last error: No error"} |
    Select Line |
    % {$_.Line.tostring().Split("'")[1]}


 $ServiceNames = $writers |
    ForEach-Object {
        switch ($_) {
            'ASR Writer' { $Result = 'VSS' }
            'Bits Writer' { $Result = 'BITS'}
             'Certificate Authority' { $Result = 'EventSystem'}
            'COM+ REGDB Writer' { $Result = 'VSS'}
            'DFS Replication service writer' { $Result = 'DFSR'}
            'Dhcp Jet Writer' { $Result = 'DHCPServer'}
            'FRS Writer' { $Result = 'NtFrs' }
            'IIS Config Writer' { $Result = 'AppHostSvc'}
            'IIS Metabase Writer' { $Result = 'IISADMIN'}
            'Microsoft Exchange Writer' { $Result = 'MSExchangeIS'}
            'Microsoft Hyper-V VSS Writer' { $Result = 'vmms'}
            'MS Search Service Writer' { $Result = 'EventSystem'}
            'NPS VSS Writer' { $Result = 'EventSystem'}
            'NTDS' { 'EventSystem'}
            'OSearch VSS Writer' { $Result = 'OSearch'}
            'OSearch14 VSS Writer' { $Result = 'OSearch14'}
            'Registry Writer' { $Result = 'VSS'}
            'Shadow Copy Optimization Writer' { $Result = 'VSS'}
            'Sharepoint Services Writer' { $Result = 'SPWriter'}
            'SPSearch VSS Writer' { $Result = 'SPSearch'}
            'SPSearch4 VSS Writer' { $Result = 'SPSearch4'}
            'SqlServerWriter' { $Result = 'SQLWriter'}
            'System Writer' { $Result = 'CryptSvc'}
            'WMI Writer' { $Result = 'Winmgmt'}
            'TermServLicensing' { $Result = 'TermServLicensing'}
        }
        $result
    }

If ($ServiceNames) { Restart-Service -Name ($ServiceNames | Select-Object -Unique) -WhatIf }

If ($Result) { Restart-Service -Name ($ServiceNames | Select-Object -Unique) -WhatIf }
Let's Encrypt Certificates for IIS
article #1257, updated 1005 days ago
Just grab the latest code here:
https://github.com/PKISharp/win-acme/releases/latest
unpack it into a folder you will keep (I used “E:\Let’s Encrypt”), and run letsencrypt.exe in the folder. The multi-site (SAN) mode works only if IIS is set up in certain ways; but the manual mode for a single site is simple and easy, and it sets up a scheduled task in Windows for the needed automatic updates.
Also recently discovered this, have not tested yet but it can come by Chocolatey, which means automatic updates are easy:
Microsoft Update Health Tools, and PSWindowsUpdate
article #1455, updated 1103 days ago
The Microsoft Update Health Tools appears to be an optional add-on which helps Windows do updates. Beyond that all of my searching has come up with vagueness. But Microsoft recommends it and often installs it without informing us, so probably it helps fairly often.
Microsoft Update Health Tools comes in KB4023057. To install KB4023057, we can use PSWindowsUpdate:
www.business.com/articles/install-windows-patches-powershell/
Here’s a complete run-anywhere command paste for preparing to use the module (administrative shell only please):
[Net.ServicePointManager]::SecurityProtocol = [Net.SecurityProtocolType]::Tls12
Set-Executionpolicy RemoteSigned -Scope Process -Force
Install-PackageProvider -Name NuGet -Force -ErrorAction 'SilentlyContinue' > $null
Set-PSRepository -Name PSGallery -InstallationPolicy Trusted
If (Get-InstalledModule -Name PsWindowsUpdate -ErrorAction 'SilentlyContinue') {
	Update-Module -Name PSWindowsUpdate -Force
} Else {
	Install-Module -Name PSWindowsUpdate -Force
}
Import-Module PSWindowsUpdate
and the command for just KB4023057:
Install-WindowsUpdate -KBArticleID KB4023057
PSWindowsUpdate is a very interesting module all by itself, it can do lots of things, e.g., install all updates available from Microsoft. Another nice function is:
Reset-WUComponents
To get a full list of functions:
Get-Command -Module PSWindowsUpdate
Get-Help works for all of them.
One can install all updates available from Microsoft, though this can be dangerous, there are huge ones and drivers and BIOS too. So this simple command won’t be here :-)
To just see the list of available updates:
Get-WindowsUpdate
To install all available updates except one KB:
Install-WindowsUpdate -AcceptAll -NotKBArticleID KB000000
and except a list (here of two) KBs:
Install-WindowsUpdate -AcceptAll -NotKBArticleID "KB000000,KB000001"
where KB000000 is a KB to be excepted. There’s also -NotCategory and -NotTitle for items without KB articles.
How to Install Microsoft ADMX Group Policy Templates
article #1082, updated 1124 days ago
When we install new group policy templates from Microsoft, e.g., the Windows 10 set by which we may upgrade existing networks, they now come in the newer ADMX format. Do this on every domain controller:
- The package is downloaded as a self-installing EXE which requires you to specify a folder. Do not try to manually unpack this, for some reason the contents are in small pieces which the installer assembles. Just run the EXE and give a useful path, e.g., C:\IT.
- Open an administrative CMD, and CD to the extraction point. Then CD into the folder “admx”, one level down.
- Run the following. If your language is not en-us, replace it in the last two lines. If your servers have multiple languages, you’ll need to replicate lines with multiple language specifications.
xcopy *.admx \\%userdnsdomain%\sysvol\%userdnsdomain%\Policies\PolicyDefinitions /Y /I
xcopy *.admx %SystemRoot%\PolicyDefinitions /Y /I
xcopy en-US\*.adml \\%userdnsdomain%\sysvol\%userdnsdomain%\Policies\PolicyDefinitions\en-us /Y /I
xcopy en-US\*.adml %SystemRoot%\PolicyDefinitions\en-us /Y /I
Another very common set needing this install, is the Office Administrative Templates.
Multiple versions of Office templates coexist nicely. But the same cannot be said for Windows OS templates. It appears that when a complete refresh of OS templates is required, good results obtain by removing all of the OS templates and then installing new.
Windows Ultimate Performance Power Scheme
article #1456, updated 1269 days ago
There is a built-in, hidden, “Ultimate Performance” power scheme in Windows 10, 11, and probably others:
powercfg -duplicatescheme e9a42b02-d5df-448d-aa00-03f14749eb61
Does not include everything in a page on this site, but integration will follow soon :-)
When AD -> Azure Sync Fails or Needs Set Up for a User
article #1417, updated 1374 days ago
There are many ways of doing this. Here is one way to bring everything into a single consistent behavior, a landing place from which you can vary slightly at need.
This presumes that you have Azure/AD sync installed and working in general, and yielding errors in the Synchronization Service window for one or more users. Make sure that you don’t have duplicate email addresses in AD, that could be bad.
The first steps are in Active Directory Users and Computers.
- Set the user’s email correctly in his/her AD object, in “E-mail” under General.
- Set proxyAddresses in the Attribute Editor. The primary email address has to be the same, and in proxyAddresses has to be of the format “SMTP:email@domain.com”. There can be others in proxyAddresses but smtp must be lowercase. Also in proxyAddresses, set mailNickname blank.
- Under Account, either the user login name plus the dropdown domain is to be the same as the above, or it is to be a valid login according to the O365 console. If the dropdown domain list is local only, you can add the Internet domain list in Active Directory Domains and Trusts, with a right-click on the root level in the left pane of that window, and then an add of one or more alternative UPN suffixes. Then restart ADUC and the domain(s) you just added will be available in the dropdown.
Now we do some other things.
- Run Azure/AD sync, this is CMD, do it as administrator:
repadmin /syncall /AdeP
@"%SystemRoot%\System32\WindowsPowerShell\v1.0\powershell.exe" -NoProfile -InputFormat None -ExecutionPolicy Bypass -Command ^
"Import-Module ADSync; Start-ADSyncSyncCycle -PolicyType Delta"
- If you see errors in the Synchronization Service window, you’ll need something called a “hard match”, which changes enough to connect the AD user with the Azure user. Here’s a script for it, in Powershell. You’ll need to run it as administrator on a domain controller, and it will ask you to log into the O365 tenant. Items of note:
- This uses something called UPN, UserPrincipalName. While Azure’s UPN is the O365 “primary email address”, Active Directory’s UPN is the double item under Profile in AD, the username plus the domain dropdown.
- If you use this approach, the Office 365 login is changed to be the same as the AD login — which is a good thing in the net result, it keeps things very consistent and predictable.
- Once the hard match is complete, you can change anything on the AD side and it will mirror up to Azure.
############################################
# Active Directory / Office 365 Hard Match #
############################################

$ADUPN = 'active_directory_user@companynetwork.com'
$AzureUPN = 'azure_user@companynetwork.com'

'############################################'
'# Active Directory / Office 365 Hard Match #'
'############################################'
''

'Initiating prep for hard match.'
"Active Directory : $ADUPN"
"Azure AD :         $AzureUPN"
''

# Sets TLS version.  Necessary for some platforms.
[Net.ServicePointManager]::SecurityProtocol = [Net.SecurityProtocolType]::Tls12

$reportStatus = ''
$currentOp = ''
function ShowProgress {
	param( [string]$reportStatus, [string]$currentOp )

	Write-Progress -Activity "Hard Match" -Status $reportStatus -PercentComplete -1 -CurrentOperation $currentOp
	# Write-Progress is not compatible with some remote shell methods.

}

Function PrepareModule {
	param( [string]$ModuleName )

	If (Get-Module -ListAvailable -Name $ModuleName)
		{ Update-Module $ModuleName }
	Else
		{ Install-Module $ModuleName }
	}

Set-ExecutionPolicy -Scope Process -ExecutionPolicy Unrestricted -Force > $null

'Preparing Powershell environment...'

ShowProgress("Preparing Powershell environment...","Setting up to use Powershell Gallery...")

ShowProgress("Preparing Powershell environment:","Setting up to use page provider NuGet...")
Install-PackageProvider -Name NuGet -Force | Out-Null

# This appears to set PSGallery nicely when need be
Register-PSRepository -Default -InstallationPolicy Trusted 2> $null
Set-PSRepository -InstallationPolicy Trusted -Name PSGallery

ShowProgress("Preparing Powershell environment...","Checking/preparing module NuGet...")
PrepareModule("NuGet")
ShowProgress("Preparing Powershell environment...","Checking/preparing module AzureAD...")
PrepareModule("AzureAD")

''
'Setting up hard match...'
''

'Connect to AzureAD:'
Connect-AzureAD

''
'Turn off AZ/AD Sync...'
''

Set-ADSyncScheduler -SyncCycleEnabled $false

"Now get original Azure ImmutableID for $AzureUPN ..."
$AzureUser = Get-AzureADUser -SearchString $AzureUPN
$OriginalAzureImmutableID = $AzureUser.ImmutableID
"Extracted Azure ImmutableID: $OriginalAzureImmutableID"
""
""
"And now extract AD GUID for $ADUPN ..."
ldifde -f export.txt -r "(Userprincipalname=$ADUPN)" -l *
$ADGUID = (-split (type export.txt | select-string "ObjectGUID"))[1]

''
"Extracted AD GUID: $ADGUID"
""
""
'Set AD GUID as Azure ImmutableID...'
Set-AzureADuser -ObjectID $AzureUser.ObjectID -ImmutableID $ADGUID

''
'New Azure ImmutableID retrieved as confirmation:'
$AzureUser = Get-AzureADUser -SearchString $AzureUPN
$AzureUser.ImmutableID

''
'Finally, turn on AZ/AD Sync again...'

Set-ADSyncScheduler -SyncCycleEnabled $true

'Done!'
Notification by Email for Windows 2008 Backup
article #359, updated 1388 days ago
It is very possible. Here is a good way.
Windows 2008 Backup Reporting by Email
I Prepare the script.
The purpose of the script is to actually send the email. We don’t use any built-in email capability, because to do so would make configuration much more complicated. The full text of the script is at the end of this document (as section III). You will need to modify the values for EmailSubject and EmailBody to match the site at which the server is located, and put this modified copy in a good safe location on the server.
The script is pre-configured for gmail. For other ISPs you may need to modify the TCP/IP email port number and/or turn SSL off.
This example will use the location “C:\0DCST\bin”, and the script file name “ReportBackupFailureByEmail.vbs”.
II Insert the script into the Task Scheduler.
1. Open up Task Scheduler, and view the Task Scheduler Library.
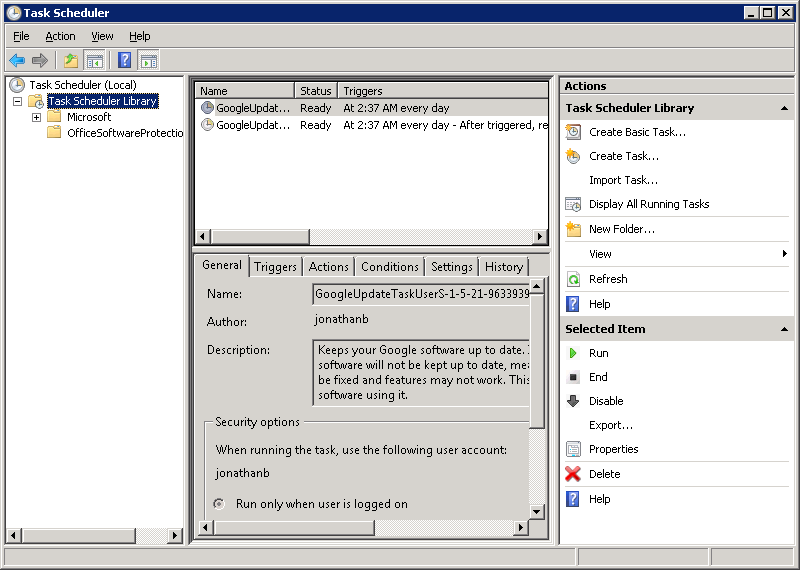
2. Select Create Task… under Actions. This gets you here:
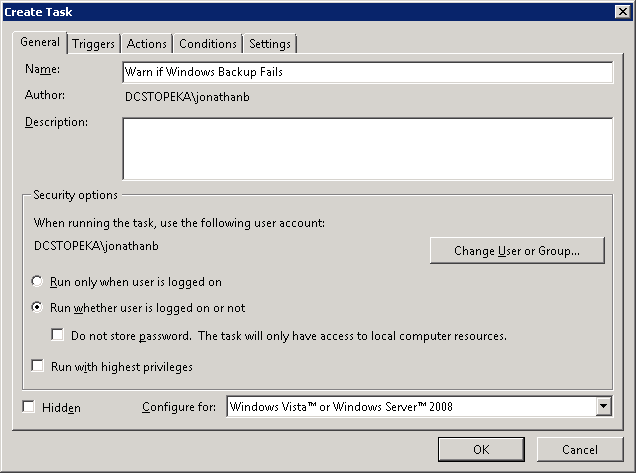
Enter a name and description for your new task. Be sure to select the option to “Run whether user is logged on or not” to ensure the task still runs after you log out.
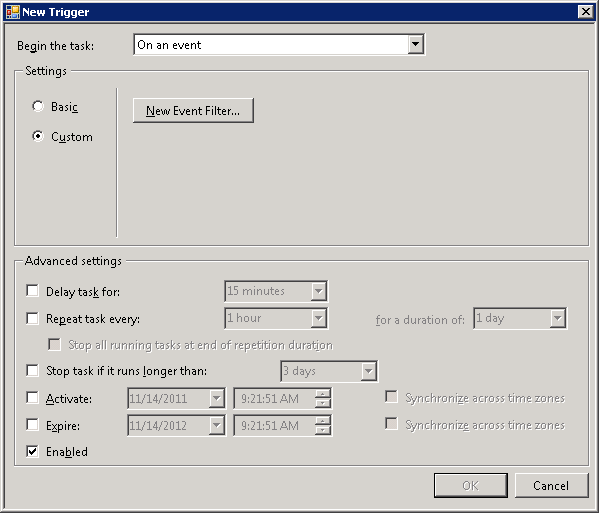
3. Click on the Triggers tab and click on New. Select “On an Event” from the drop down. Choose “Custom” under Settings.
4. Click on “New Event Filter…”. Then, choose as follows:
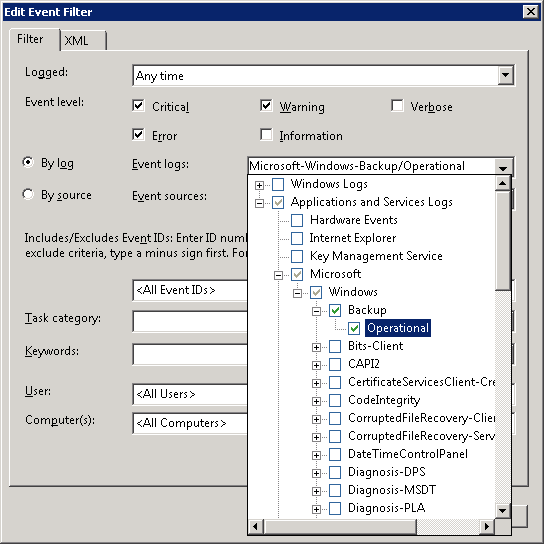
Select all of the event levels except “Information” and Verbose”. Then select “By log”. In the Event Logs dropdown, open Applications and Services Logs, then Microsoft, then Windows, then Backup, and choose Operational.
Once your end result looks like this:
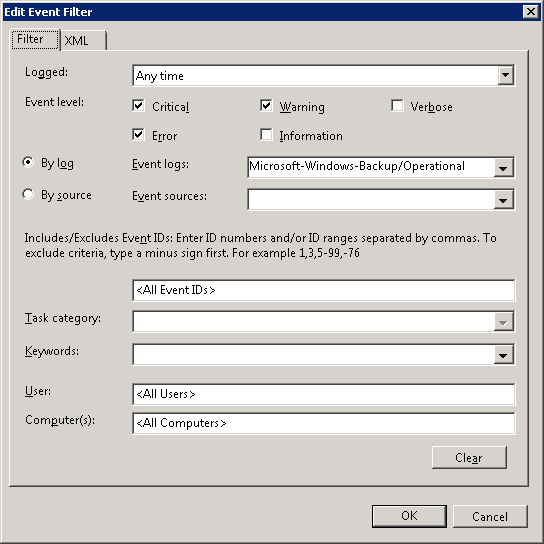
press OK.
5. Head over to the Actions tab and select “New…”. For this example, the following is correct:
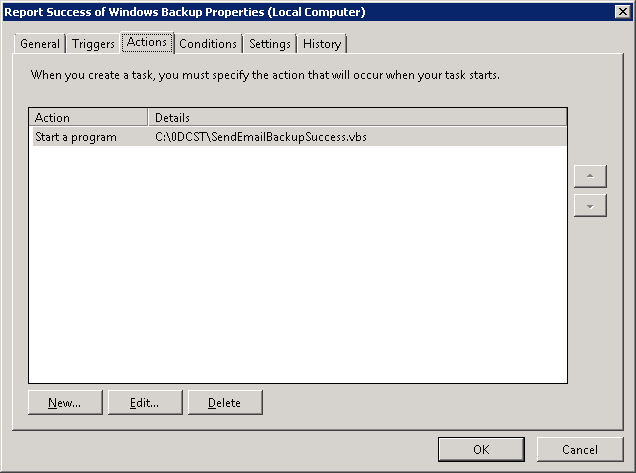
Press OK and OK, put in your authentication, and you’re done!
III The Script:
''''''''''''''''''''''''''''''''''
' Report Backup Failure by Email '
''''''''''''''''''''''''''''''''''

' Script version 1.0
' Needs to be run by Task Manager, triggered by appropriate events

' Modify lines below only to fit site, server, and email configuration

ServerName = "SERVERNAME"
SiteName = "SITENAME"

Const EmailFrom = "emailfrom@gmail.com"
Const EmailFromName = "From Name"
Const EmailTo = "emailto@domain.xyz"
Const SMTPServer = "smtp.gmail.com"
Const SMTPLogon = "emailfrom@gmail.com"
Const SMTPPassword = "gmailpassword"

Const SMTPSSL = True
Const SMTPPort = 465

' Do not modify anything further below

EmailSubject = ServerName & ":  Windows 2008 Backup has failed"

EmailBody = "A failure of Windows 2008 Backup has been recorded " & _
		"at site " & SiteName & " on server " & ServerName & ", " & _
		"on " & Date & ", " & Time & " ."

Const cdoSendUsingPickup = 1 	'Send message using local SMTP service pickup directory.
Const cdoSendUsingPort = 2 	'Send the message using SMTP over TCP/IP networking.

Const cdoAnonymous = 0 	' No authentication
Const cdoBasic = 1 	' BASIC clear text authentication
Const cdoNTLM = 2 	' NTLM, Microsoft proprietary authentication

' First, create the message

Set objMessage = CreateObject("CDO.Message")
objMessage.Subject = EmailSubject
objMessage.From = """" & EmailFromName & """ <" & EmailFrom & ">"
objMessage.To = EmailTo
objMessage.TextBody = EmailBody

' Second, configure the server

objMessage.Configuration.Fields.Item _
("http://schemas.microsoft.com/cdo/configuration/sendusing") = cdoSendUsingPort

objMessage.Configuration.Fields.Item _
("http://schemas.microsoft.com/cdo/configuration/smtpserver") = SMTPServer

objMessage.Configuration.Fields.Item _
("http://schemas.microsoft.com/cdo/configuration/smtpauthenticate") = cdoBasic

objMessage.Configuration.Fields.Item _
("http://schemas.microsoft.com/cdo/configuration/sendusername") = SMTPLogon

objMessage.Configuration.Fields.Item _
("http://schemas.microsoft.com/cdo/configuration/sendpassword") = SMTPPassword

objMessage.Configuration.Fields.Item _
("http://schemas.microsoft.com/cdo/configuration/smtpserverport") = SMTPPort

objMessage.Configuration.Fields.Item _
("http://schemas.microsoft.com/cdo/configuration/smtpusessl") = SMTPSSL

objMessage.Configuration.Fields.Item _
("http://schemas.microsoft.com/cdo/configuration/smtpconnectiontimeout") = 60

objMessage.Configuration.Fields.Update

' Now send the message!

objMessage.Send